Installation
Get AI assistants connected to your Directus instance in three simple steps. The MCP server is built into Directus with no additional setup required.
Quick Setup
The Directus MCP server is disabled by default and must be manually enabled. When enabled, it uses the same permissions as the user account you connect with. AI tools can only access what that user is allowed to see and do.
System administrators can completely disable MCP functionality through configuration environment variables.
Choose a Tool Mode
Tool definitions include names, descriptions, and input schemas. When an MCP client loads every definition into the model prompt, those definitions consume context before the model receives your conversation, data, or tool results. This cost grows as you connect more MCP servers.
Directus supports two tool modes so you can choose where tool discovery happens:
| Mode | Tool discovery | Use it when |
|---|---|---|
| Default | Your MCP client selects from the individual Directus tools | Your client searches or loads tools on demand, or you want per-tool approval controls |
| Registry | Directus exposes a small registry that the model searches | Your client loads every tool definition upfront, has a tool-count limit, or spends too much context on unused tools |
Default Mode
The default MCP URL exposes each Directus tool separately to the client:
https://your-directus-url.com/mcp
Prefer this mode when your client provides its own tool search or deferred loading. The client can keep unused schemas out of the model context while preserving the names, descriptions, annotations, and approval settings of individual Directus tools.
For example, Claude Code enables MCP Tool Search by default on supported models, and current versions of Cursor dynamically load the MCP tools they need. Custom clients using supported OpenAI models can also opt into tool search. In these cases, registry mode usually duplicates work the client already performs.
Some clients use tool search only after reaching a threshold. For example, VS Code's experimental virtual tools setting only activates above a default threshold of 128 tools. Registry mode can still reduce upfront context below that threshold.
Client-side search can also depend on the client version, selected model, model provider, proxy, or settings. Use registry mode if your client falls back to loading every tool upfront.
Registry Mode
Registry mode exposes only search, execute, and schema to the client. The model searches for the right Directus tool, loads only its input details, then calls it through execute.
https://your-directus-url.com/mcp?tool_mode=registry
Use registry mode when your client sends all available tool definitions to the model, does not support tool search, or fails because too many tools are enabled. It keeps the initial Directus tool surface fixed at three tools regardless of how many tools Directus provides.
This smaller initial surface leaves more of the context window for your instructions, conversation history, Directus schema, and results. It can also make tool selection easier by removing unrelated definitions from the model's immediate choices.
Registry mode has two trade-offs:
- The model normally makes extra
searchcalls beforeexecute, which can add latency and tool-call overhead. - The MCP client shows most operations as
execute, with the underlying Directus tool nested in its input. Tool pickers, call history, approval rules, and allow lists cannot treatitems,files,collections, or other inner tools separately.
Authentication, Directus permissions, admin-only restrictions, and the Allow Deletes setting work the same in both modes. When using a static token in the URL, combine the parameters like this:
https://your-directus-url.com/mcp?tool_mode=registry&access_token=your-generated-token
execute. It can run both read and write operations, and the client cannot apply the underlying tool's individual approval policy. Use scoped Directus permissions and keep the Allow Deletes setting disabled unless you need it.Choose an Authentication Method
Directus supports two ways to authenticate remote MCP clients. Use OAuth when your client supports remote server OAuth discovery and browser authorization. Use a static access token when your client requires a manually configured bearer token, header, or query parameter.
Enable MCP in Directus
- Log into your Directus admin as an administrator
- Go to Settings → AI → Model Context Protocol
- Click Enabled under MCP Server to activate the MCP server
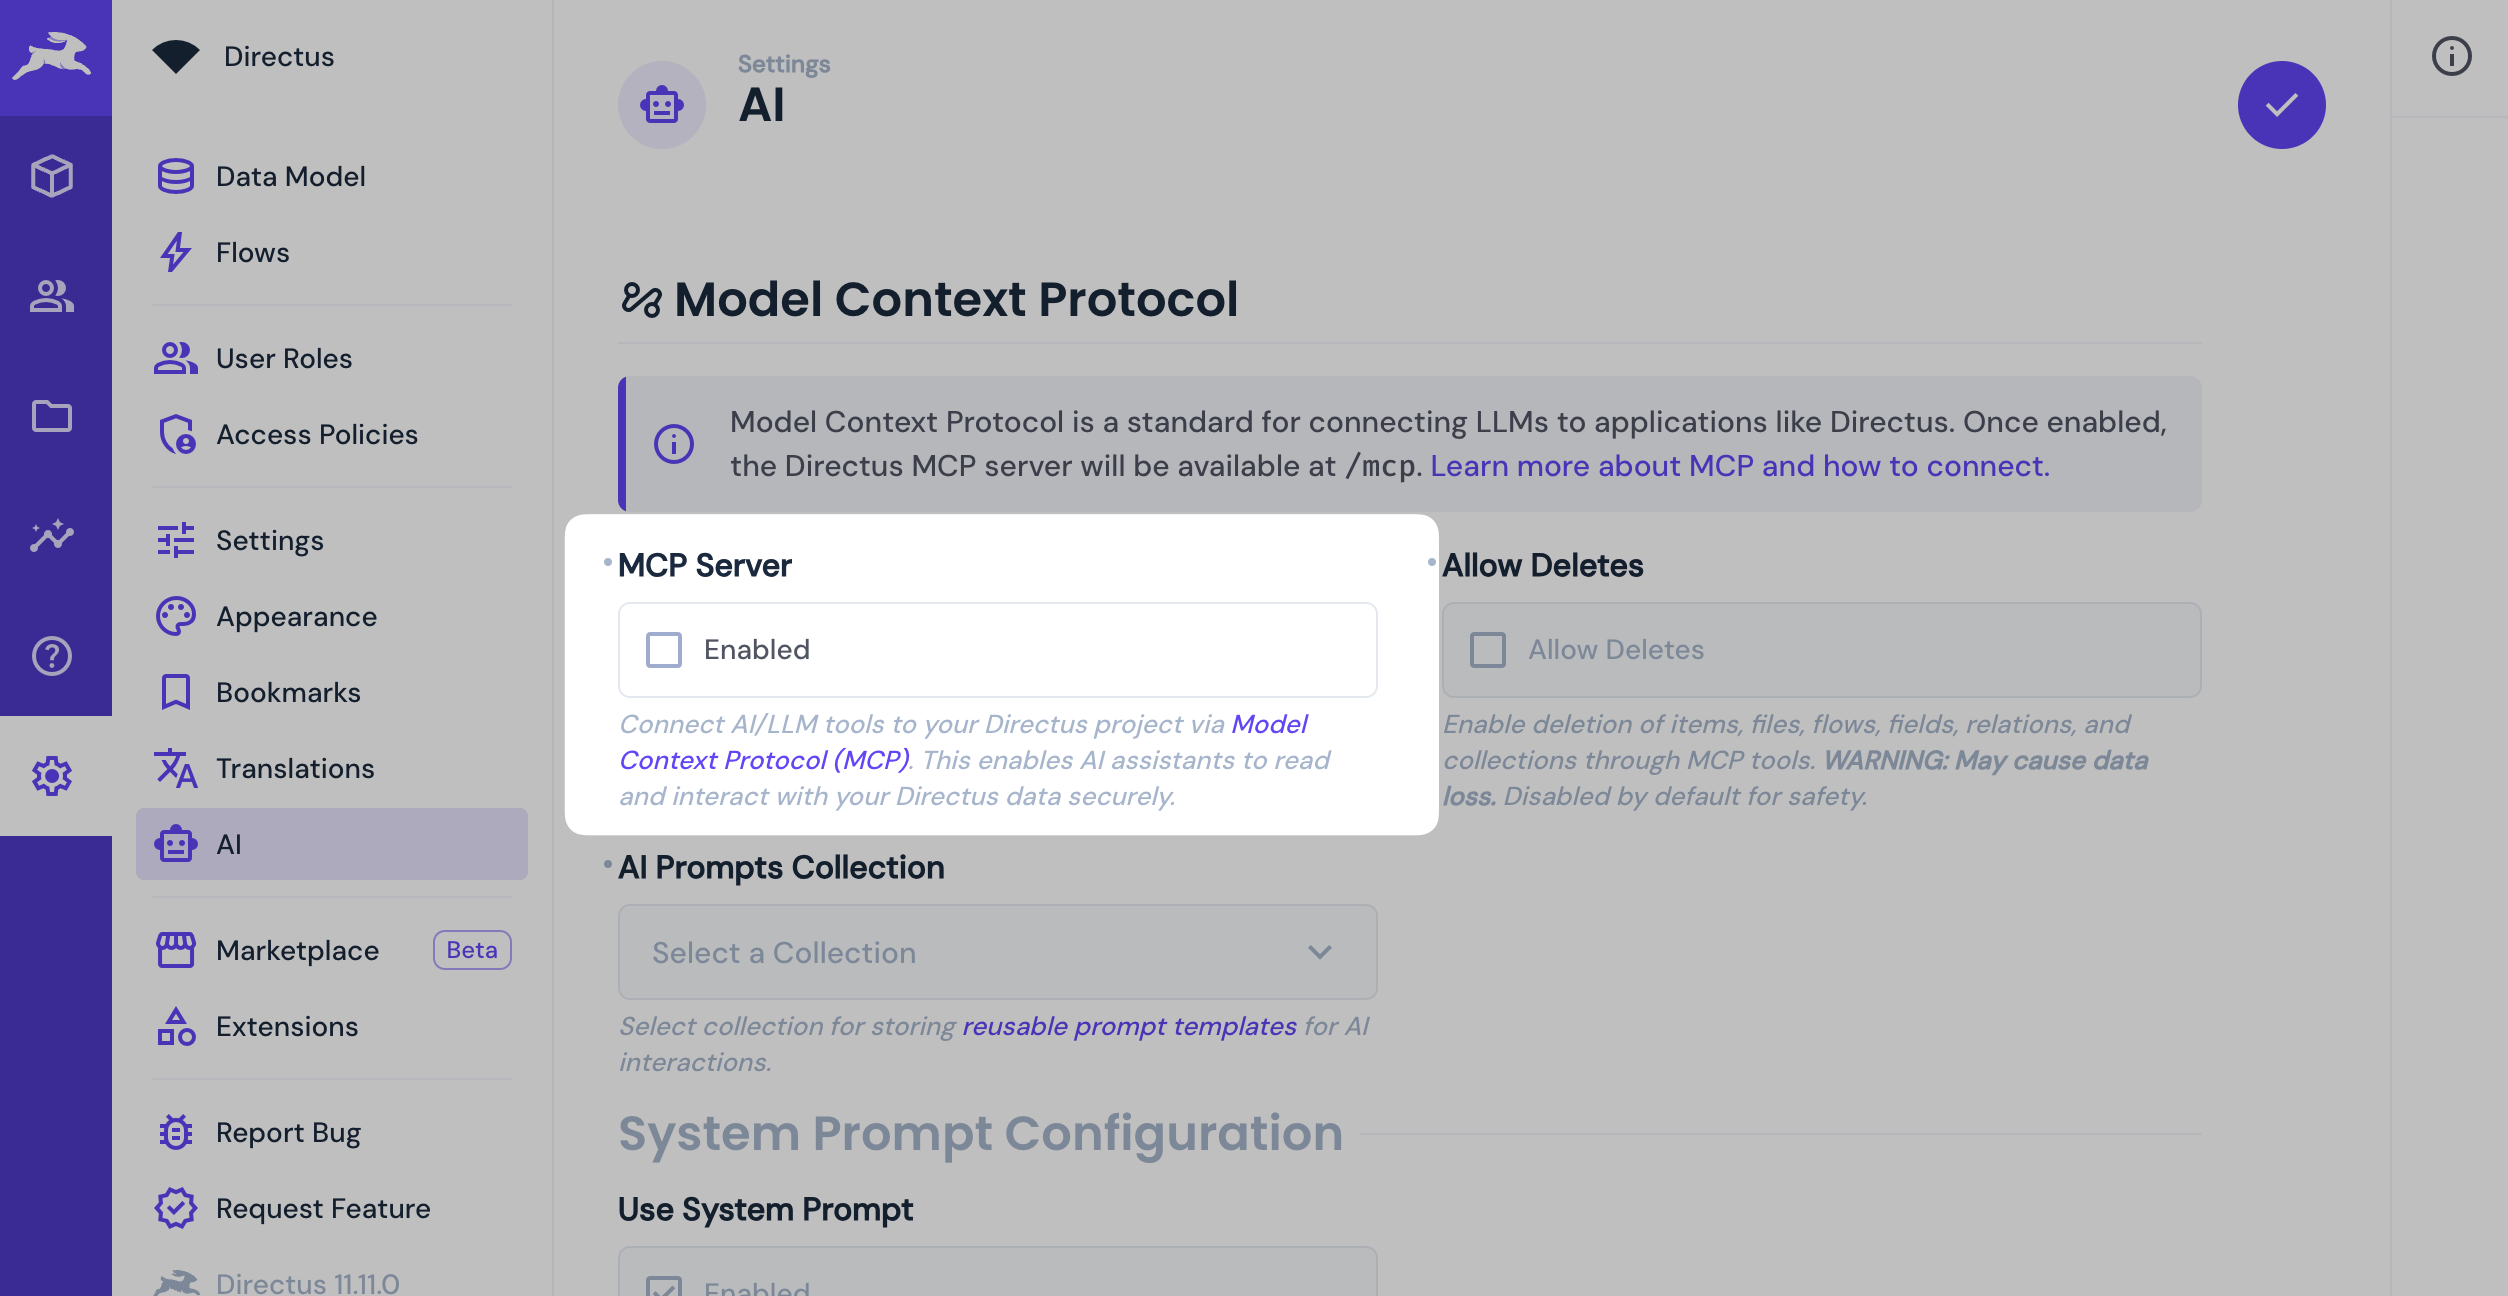
- Save the AI settings
https://your-directus-url.com/mcp.Configure Authentication
Recommended: OAuth
OAuth lets users sign in to Directus in the browser and approve MCP access from a consent page. The issued token is scoped to the MCP endpoint.
For self-hosted projects, enable the OAuth server and a client registration method. Prefer Client ID Metadata Document registration when your client supports it because it avoids unauthenticated local client creation:
MCP_OAUTH_ENABLED=true
MCP_OAUTH_CIMD_ENABLED=true
PUBLIC_URL=https://directus.example.com
Use MCP_OAUTH_CIMD_ENABLED=true for Client ID Metadata Document registration, MCP_OAUTH_DCR_ENABLED=true for Dynamic Client Registration, or both if you intentionally support both onboarding paths.
After restarting Directus, go to Settings > AI > Model Context Protocol, enable OAuth Enabled, and enable the matching client registration setting for the project.
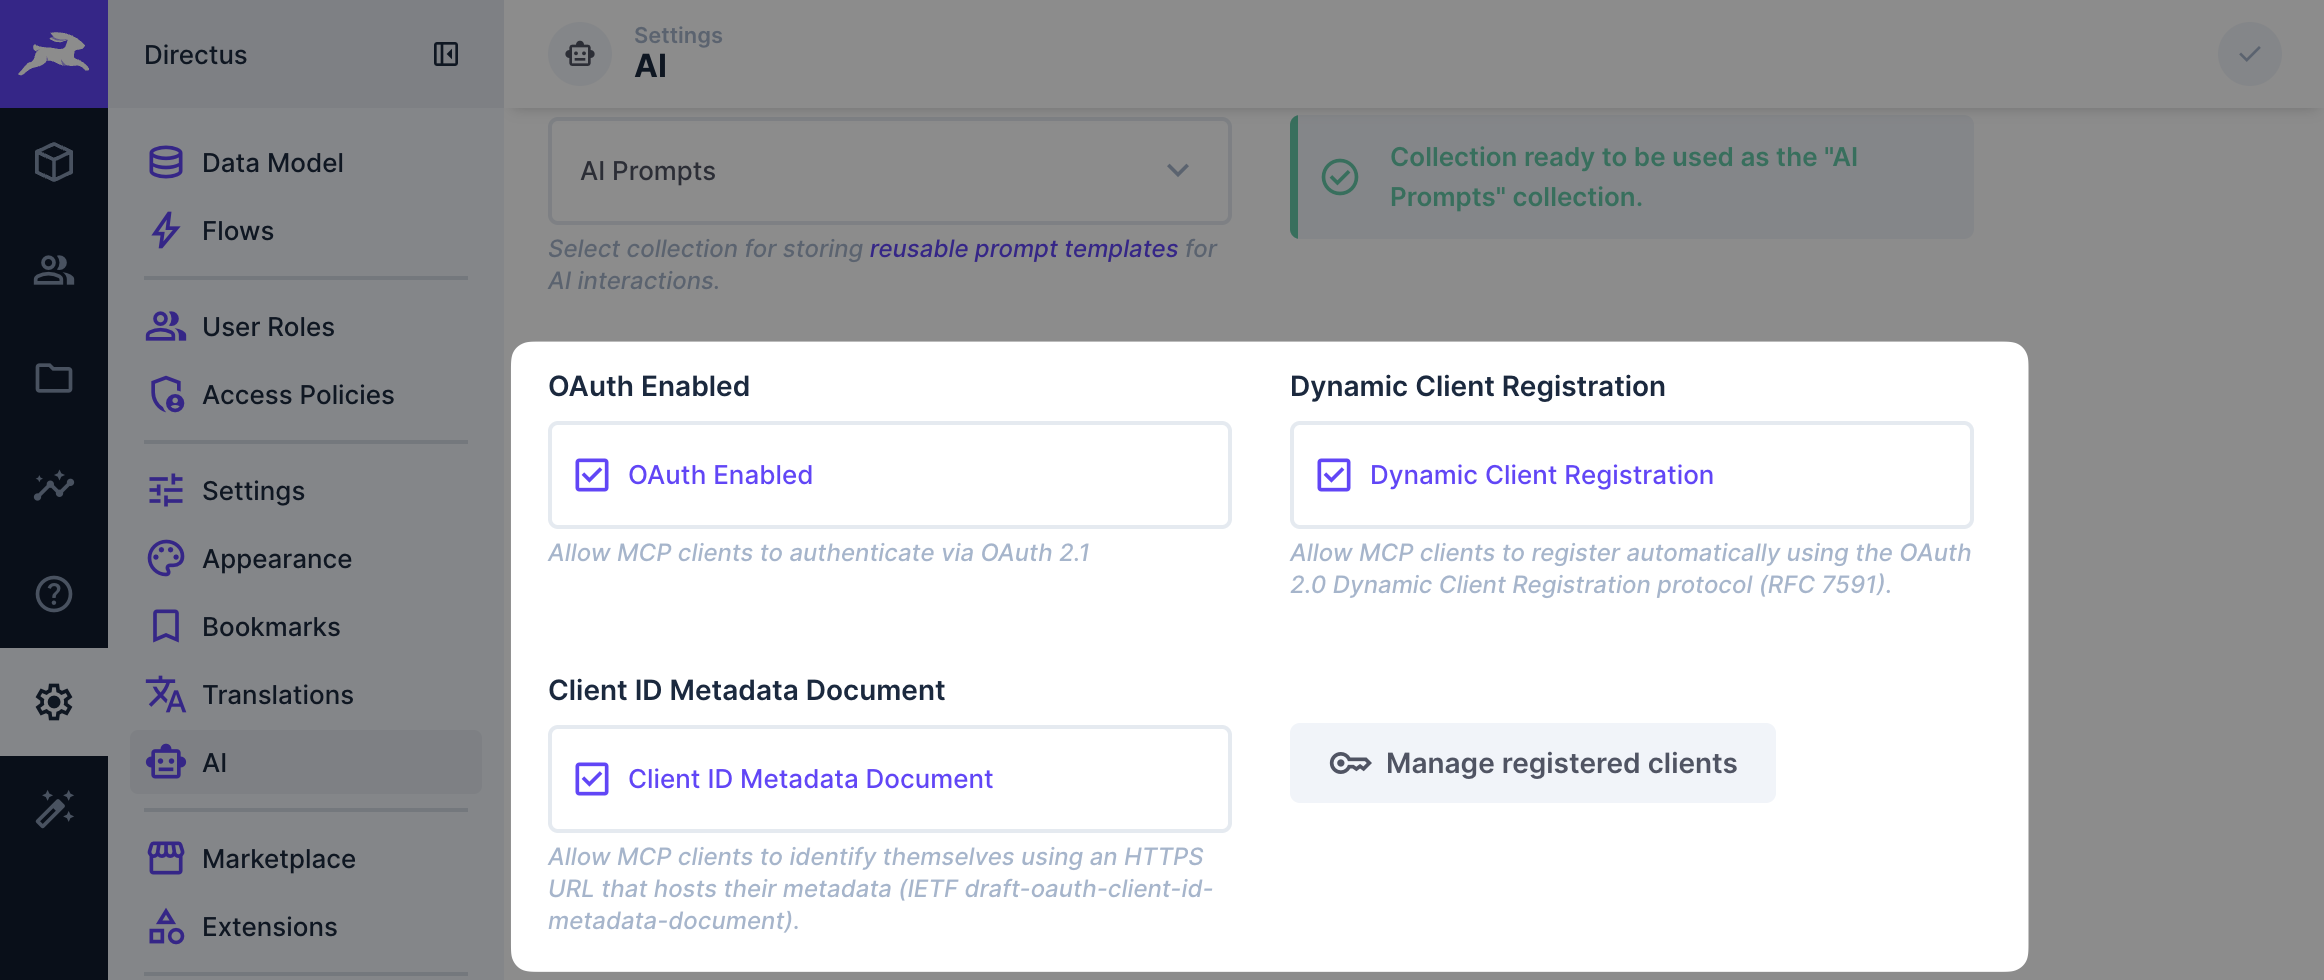
Read the MCP OAuth guide for the full authorization flow, client registration behavior, and revocation steps.
Fallback: Static Access Token
Static access tokens work with clients that do not support MCP OAuth. Use a dedicated Directus user when possible.
- Navigate to User Directory.
- Click Create User.
- Configure the user:
- Name:
Your Name - MCP Useror similar - Email: Email is not required for MCP operations.
- Role: Create a new role or use an existing role with appropriate permissions.
- Name:
- Open the user profile.
- Scroll to the Token field and generate a new token.
- Copy the token, then save the user. ::
Connect Your AI Client
You control the LLM integration. This tool connects to your own language model - either self-hosted or via a public service like OpenAI, Anthropic, or others.
If your client supports MCP OAuth, connect to https://your-directus-url.com/mcp without adding an access token to the URL or headers. Use Client ID Metadata Document registration when your client supports it. Use Dynamic Client Registration when the client requires it.
OAuth
ChatGPT currently uses Dynamic Client Registration.
- Log into ChatGPT with Pro/Teams account.
- Go to Settings > Apps & Connectors.
- Click Create in the top-right corner.
- Configure:
- Name: Directus MCP
- MCP Server URL:
https://your-directus-url.com/mcp - Authentication: OAuth
- Open Advanced OAuth settings and use Dynamic Client Registration.
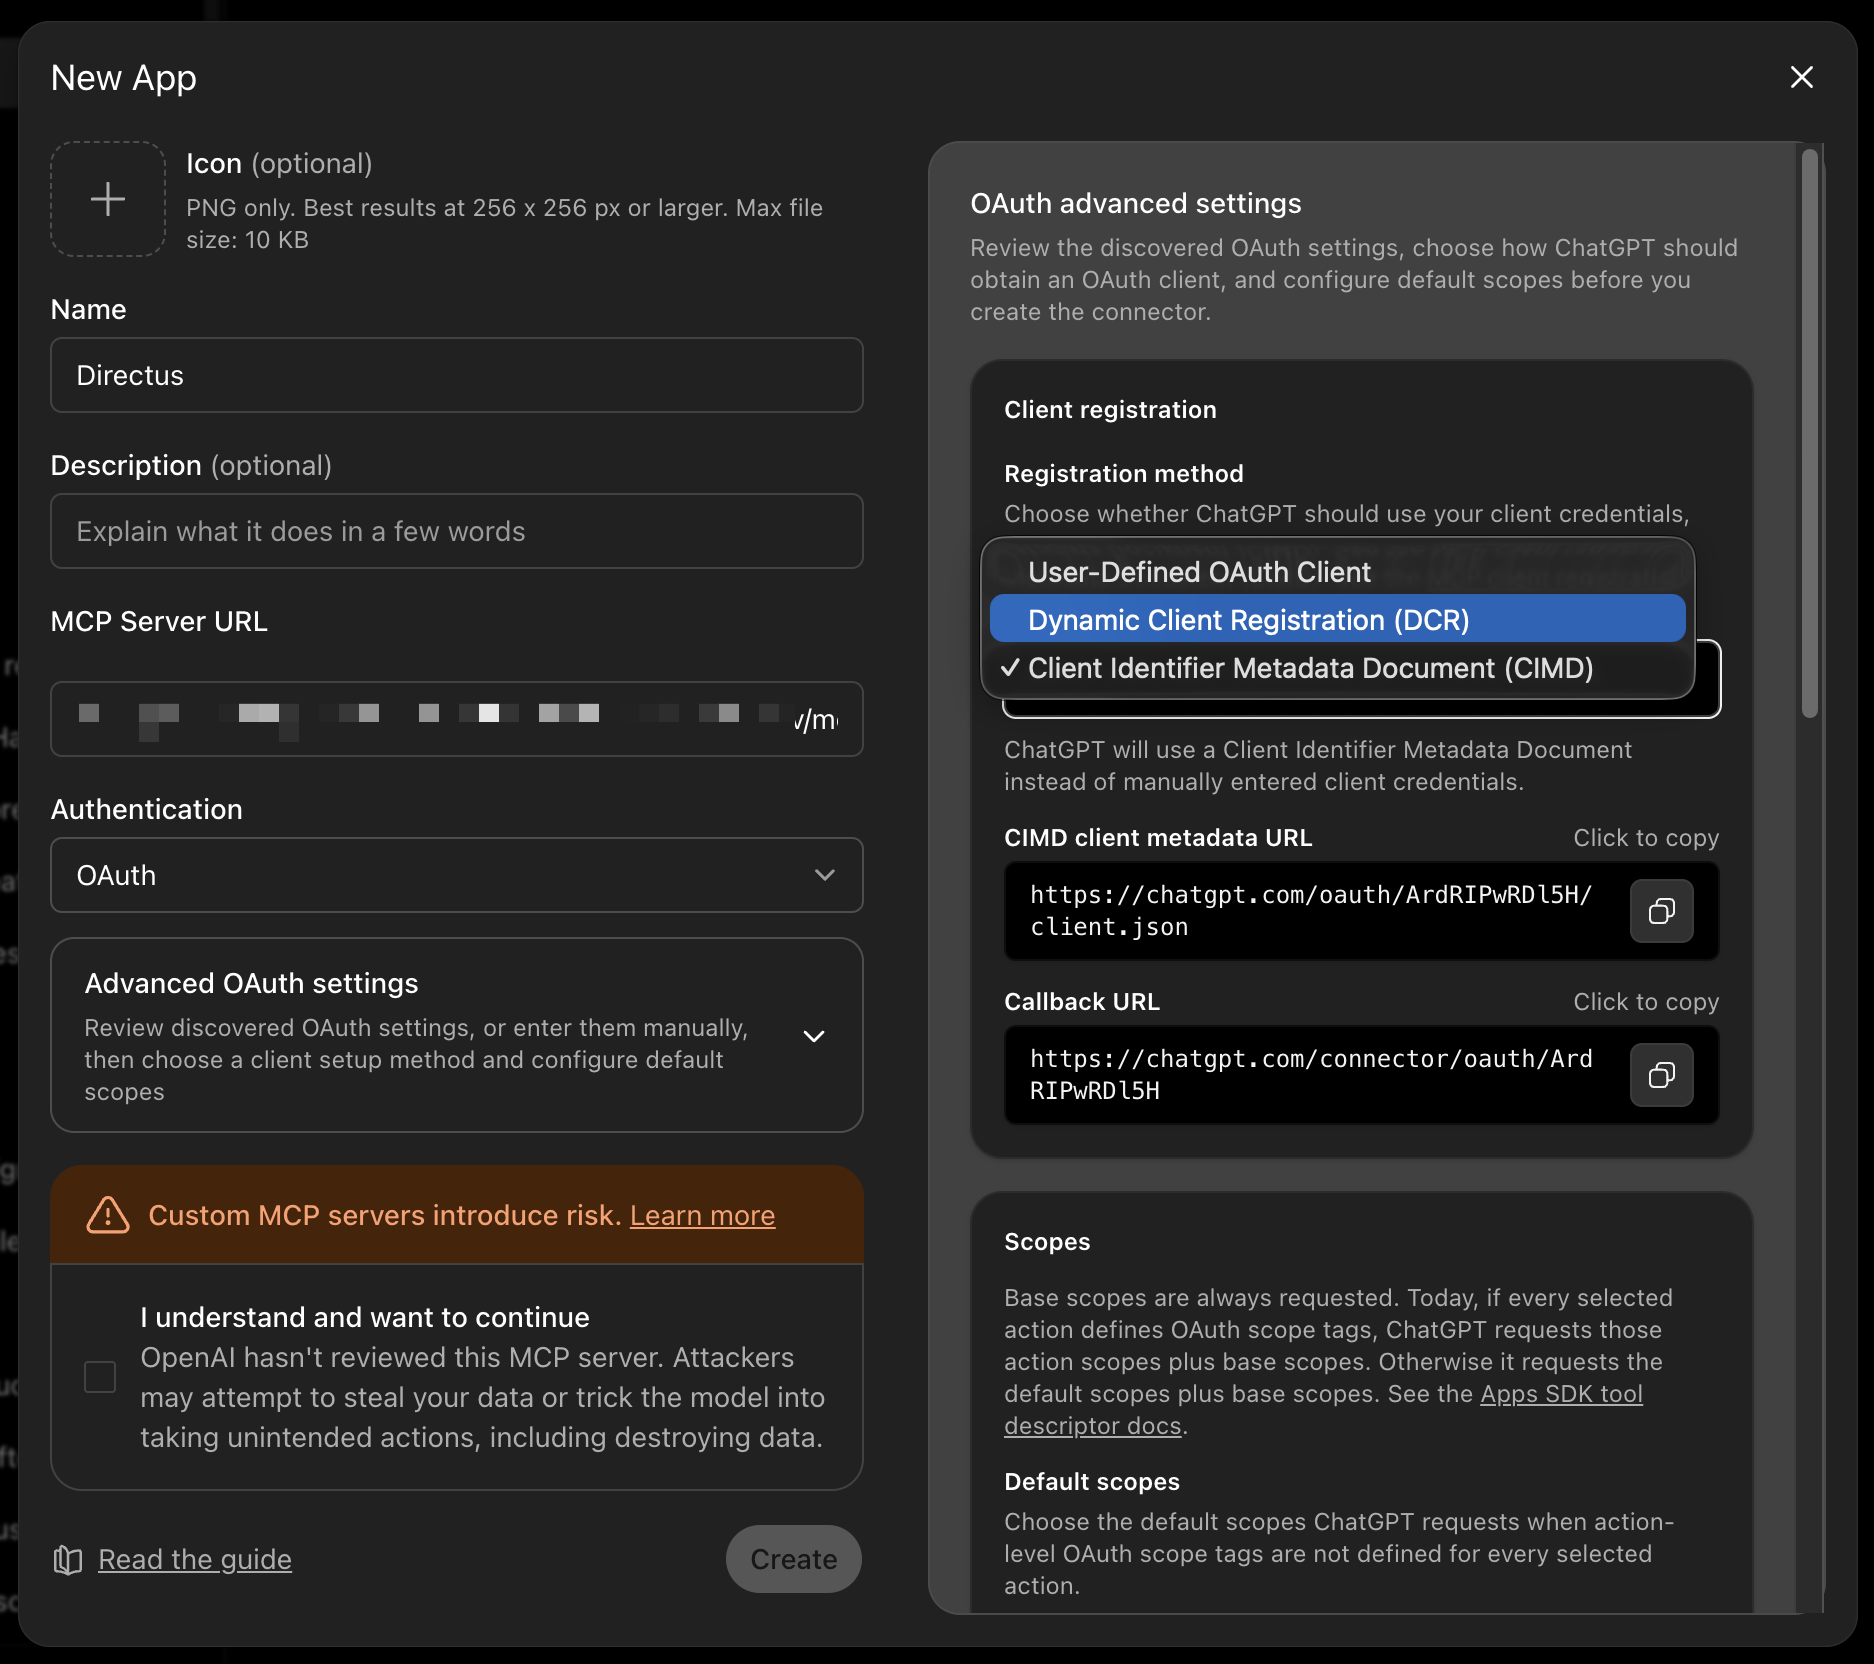
- Click Create to save the connector and complete the browser authorization flow.
Static Access Token
Use this fallback when OAuth is not available for your setup.
- Click Create in Settings > Apps & Connectors.
- Configure:
- Name: Directus MCP
- MCP Server URL:
https://your-directus-url.com/mcp?access_token=your-generated-token - Authentication: No authentication
- Click Create to save the connector.
OAuth
Claude Desktop works with Client ID Metadata Document registration and Dynamic Client Registration. Prefer CIMD when available.
- Open your connector settings.
- Add a custom connector.
- Configure:
- Name: Directus MCP
- Server URL:
https://your-directus-url.com/mcp
- Complete the browser authorization flow when prompted.
Static Access Token
- Open Settings > Connectors.
- Click Add custom connector.
- Configure the connector:
- Name: Directus MCP
- Server URL:
https://your-directus-url.com/mcp?access_token=your-generated-token
- Click Add to save the connector.
- Review and accept the permissions when prompted.
OAuth
Claude.ai works with Client ID Metadata Document registration and Dynamic Client Registration. Prefer CIMD when available.
- Open your connector settings.
- Add a custom connector.
- Configure:
- Name: Directus MCP
- Server URL:
https://your-directus-url.com/mcp
- Complete the browser authorization flow when prompted.
OAuth
Claude Code works with Client ID Metadata Document registration and Dynamic Client Registration. Prefer CIMD when available.
- Install Claude Code CLI.
- Add Directus MCP server using the command line:
claude mcp add --transport http directus https://your-directus-url.com/mcp
- Start Claude Code and complete the browser authorization flow when prompted.
Static Access Token
Use a static token only when OAuth is not available for your setup.
claude mcp add --transport http directus https://your-directus-url.com/mcp \
  --header "Authorization: Bearer your-generated-token"
OAuth
Raycast currently uses Dynamic Client Registration.
- Download Raycast.
- Open Raycast and search for "MCP Servers".
- Configure Directus MCP server through the UI:
- Name: Directus MCP
- URL:
https://your-directus-url.com/mcp
- Save the configuration and complete the browser authorization flow.
Static Access Token
Use this fallback when OAuth is not available for your setup.
- Open Raycast and search for "MCP Servers".
- Configure Directus MCP server through the UI:
- Name: Directus MCP
- URL:
https://your-directus-url.com/mcp?access_token=your-generated-token
- Save the configuration.
OAuth
VS Code uses Client ID Metadata Document registration and does not fall back to Dynamic Client Registration.
- Install VS Code 1.102+ and the GitHub Copilot extension.
- Create or edit
mcp.jsonin your workspace.vscodefolder or user settings. - Add this configuration:
{
  "servers": {
    "directus": {
      "url": "https://your-directus-url.com/mcp",
      "type": "http"
    }
  }
}
- Use MCP tools in Agent mode from the Chat view and complete the browser authorization flow when prompted.
Static Access Token
Use this fallback when OAuth is not available for your setup.
{
  "servers": {
    "directus": {
      "type": "http",
      "url": "https://your-directus-url.com/mcp",
      "headers": {
        "Authorization": "Bearer ${input:directus-token}"
      }
    }
  },
  "inputs": [
    {
      "id": "directus-token",
      "type": "promptString",
      "description": "Directus Access Token",
      "password": true
    }
  ]
}
VS Code will prompt you for your Directus token when the server starts.
OAuth
Cursor currently uses Dynamic Client Registration.

- One-click install: Click the button above to automatically configure Directus MCP in Cursor.
- Manual setup: Alternatively, create
.cursor/mcp.jsonin your project root:
{
  "mcpServers": {
    "directus": {
      "url": "https://your-directus-url.com/mcp"
    }
  }
}
- Replace
your-directus-url.comwith your Directus URL and complete the browser authorization flow when prompted.
Static Access Token
- One-click install: Click the button above to automatically configure Directus MCP in Cursor.
- Manual setup: Alternatively, create
.cursor/mcp.jsonin your project root:
{
  "mcpServers": {
    "directus": {
      "url": "https://your-directus-url.com/mcp",
      "headers": {
        "Authorization": "Bearer your-generated-token"
      }
    }
  }
}
- Replace
your-directus-url.comandyour-generated-tokenwith your values.
::
Verify Connection
Once connected, test your setup with a simple question about your Directus instance:
:::chat
chatId: "verify-connection" messages:
- role: user content: "Can you tell me about my Directus schema?"
- role: assistant
content: "I'll help you explore your Directus schema. Let me start by getting my role information and then examine your database structure."
toolInvocations:
- toolCallId: "system-prompt" toolName: "system-prompt" state: "result"
- toolCallId: "schema" toolName: "schema" state: "result"
:::
User Permissions
Configure your AI user's role based on what you want them to do:
Content Editor Role (recommended for most users):
- Collections: Read/Create/Update on your content collections
- Files: Read/Create/Update/Delete
- Folders: Read/Create/Update/Delete
- System Collections: Read only
Developer Role (required for schema management):
- All content permissions above, plus:
- Collections: Full CRUD access
- Fields: Full CRUD access
- Relations: Full CRUD access
- Flows: Full CRUD access
or add the administrator role to your MCP user.
MCP Server Settings
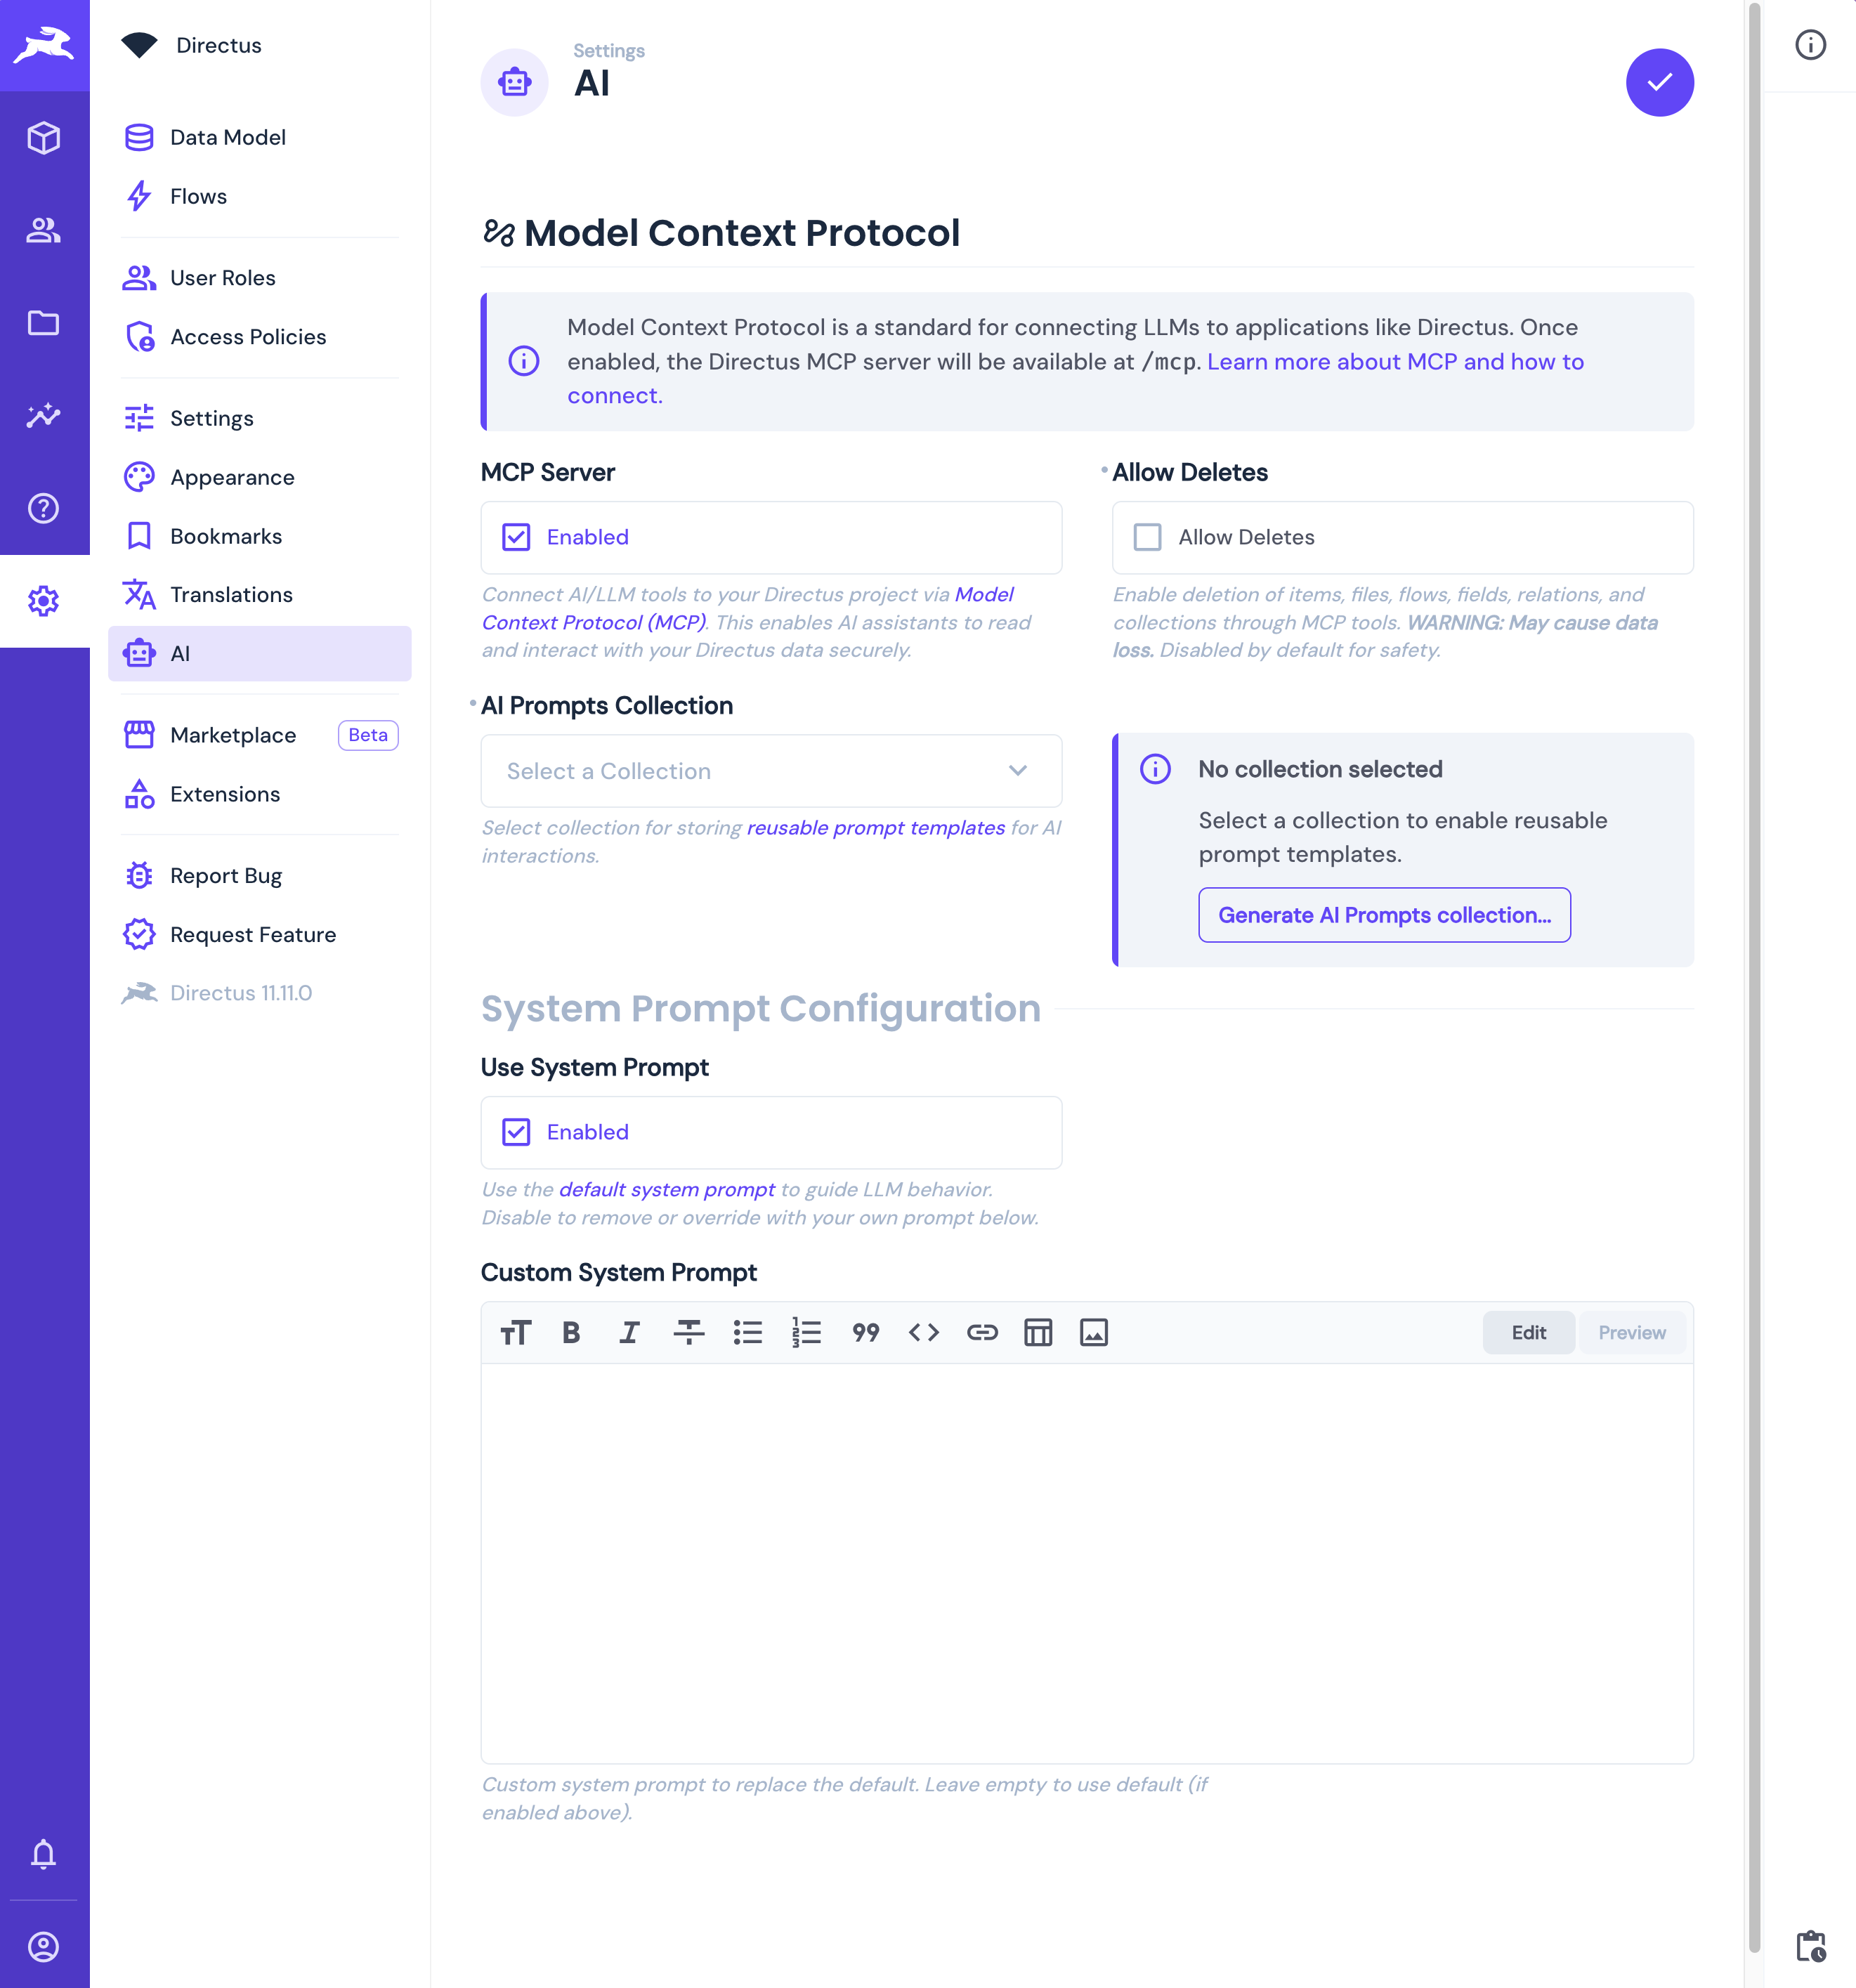
Access advanced options in Settings → AI → Model Context Protocol:
| Setting | Type | Default | Description |
|---|---|---|---|
| MCP Server | Toggle | Disabled | Connect AI/LLM tools to your Directus project via Model Context Protocol (MCP). This enables AI assistants to read and interact with your Directus data securely. |
| Allow Deletes | Toggle | Disabled | Enable deletion of items, files, flows, fields, relations, and collections through MCP tools. WARNING: May cause data loss. Disabled by default for safety. |
| AI Prompts Collection | Select | No collection selected | Select a collection to enable reusable prompt templates. Select existing collection or click "Generate AI Prompts collection..." to create one automatically. |
| Use System Prompt | Toggle | Enabled | Use the default system prompt to guide LLM behavior. Disable to remove or override with your own prompt below. |
| Custom System Prompt | Rich Text | Empty | Custom system prompt to replace the default. Leave empty to use default (if enabled above). |
Next Steps
Your MCP server is ready! Here's what to explore:
Get once-a-month release notes & real‑world code tips...no fluff. 🐰